Custom Event
Custom events are functions that allow you to trigger events on other graphs.
Workflow
Definition
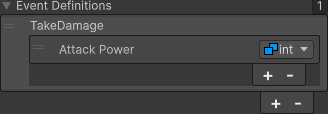
To use a custom event, you must first define the custom event.
You can then receive and call the event based on the custom event definition data.
You can also set parameters to be passed in the definition data.
Receive
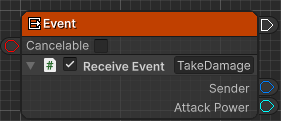
Next, use the Receive Event Component associated with the custom event definition to receive the event.
If the custom event definition includes parameters, you can output the values of the parameters passed when the event is called.
Invoke
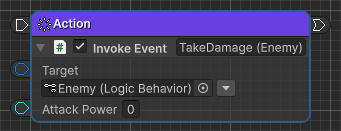
To invoke a custom event, use Invoke Event Action.
If the custom event definition includes parameters, you can enter the values of the parameters you want to pass when the event is invoked.
Objects that can be defined
Logic Controller
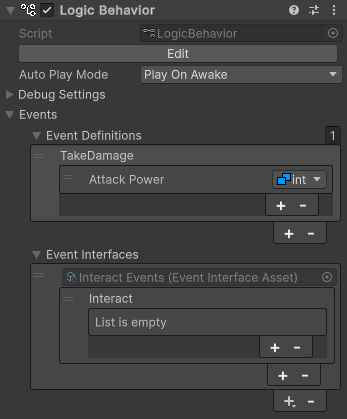
You can define custom events directly on objects that contain a Logic Controller, such as Logic Behavior or Logic Asset.
Additionally, by associating an Event Interface Asset, you can receive generic events that are not dependent on the graph object.
For details, see Logic Controller.
Event Interface Asset
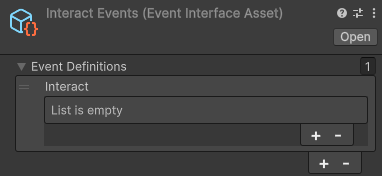
Event Interface Asset is an asset that can only set custom event definitions.
Through this asset, you can call generic events that do not depend on the definition of a specific graph object.
By associating it with a Logic Controller, you will be able to receive events.
For more information, see Event Interface Asset.
How to use
Defining custom events
This can be set in the Events tab of the Logic Editor window or in the Inspector window of each object.
- Click the “+” button in Event Definitions.
- Enter a name and press
Enterto confirm.
Defining parameters
Define the parameters to be passed when the event is invoked.
- Click the “+” button in the parameter list.
- Enter a name and press
Enterto confirm. - Click the type drop-down.
- Select the type you want to pass from the type selection menu.
Associating an Event Interface Asset
This can be set in the Events tab of the Logic Editor window or in the Inspector window of each object.
- Click the “+” button next to Event Interfaces.
- Select the Event Interface Asset you want to associate from the menu.
You can also create a new Event Interface Asset by selecting <Create> from the menu.
Receiving custom events
You must first define a custom event for your graph object.
Node creation menu
- On the graph, press the
Spacebarto open the node creation menu. - Select the Scripts tab.
- Enter
Receive Eventsin the search field. - Select Event Name (Node Type) from the menu.
- Enter the node name and confirm with the
Enter key.
Drag and Drop
- Drag and drop the custom event definition in the Events tab to open the node creation menu.
- Select Receive Event (node type) from the menu.
- Enter the node name and confirm with the
Enter key.
Invoking custom events
You must first define a custom event that can be fired.
Node creation menu
- On the graph, press the
Spacebarto open the node creation menu. - Select the Scripts tab.
- Enter
Invoke Eventsin the search field. - Select Event Name (Node Type) from the menu.
- Enter the node name and confirm with the
Enter key.
Drag and Drop
- Click the lock icon in the top right of the Logic Editor window to lock the selected object.
- Select the object you want to invoke.
- Drag and drop the custom event definition in the Inspector window to open the node creation menu.
- Select Invoke Event (node type) from the menu.
- Enter the node name and confirm with
Enter. - Unlock the Logic Editor window if necessary.